Monday, May 20, 2013

IKEA Trofast kids storage revamp


Who ever has enough storage? Nobody I've ever met anyway. Good storage solutions are always a blessing I think.

This storage is part of the playcorner solution... I know! Don't even mention it...it's taking forever. But hey, I'm making progress which is an absolute miracle with a cruising baby around my feet, a household to run and a part time job to hold down.


Also have you tried painting or any DIY while you're baby is around? My GOD! Chaos. He grabs the paint brush, drops his toys in the paint bucket then takes it out and crawls away, touches everything that is freshly painted and gets very upset if you try to stop him. So consider all this if you are thinking of getting DIY done with a baby... but then just do it anyway because however frustrating the situation is, the memory of it is sweet.

Back to the point, here is what I did with this great storage solution from IKEA. (IKEA better start sponsoring me soon, I'm making a pretty good commercial for them all the time.)


The reasons I bought this piece:

- by pure luck it is the perfect size for my corner
- okay price. not cheap, but okay
- solid wood frame
- blank canvas to customise
- the light weight plastic boxes are easy for baby to drag around the house
- and they are also handy for me to drag around and throw everything in it to tidy
up quick

Originally I was gonna get an old chest of drawers in Oxfam or in the flea and upcycle it to a toy storage chest, but I realised this will be easier and more practical for this time of our life.

And here is how I did it:

1) Firstly, because it is comes lacquered (pity), I applied a primer onto it to be able to paint on directly

2) I next painted the outside with a wall paint called 'book room red' and the inside with a colour called 'olive green' (both Farrow & Ball sample pot paints)

I choose subtle colours because the wall it's going against is a dark muddy green which dominates already. However if it was going against a pale wall I would have gone with a strong red, or glossy orange or deep dark colours like muddy grey or back.

3) with a water based varnish I sealed the paint

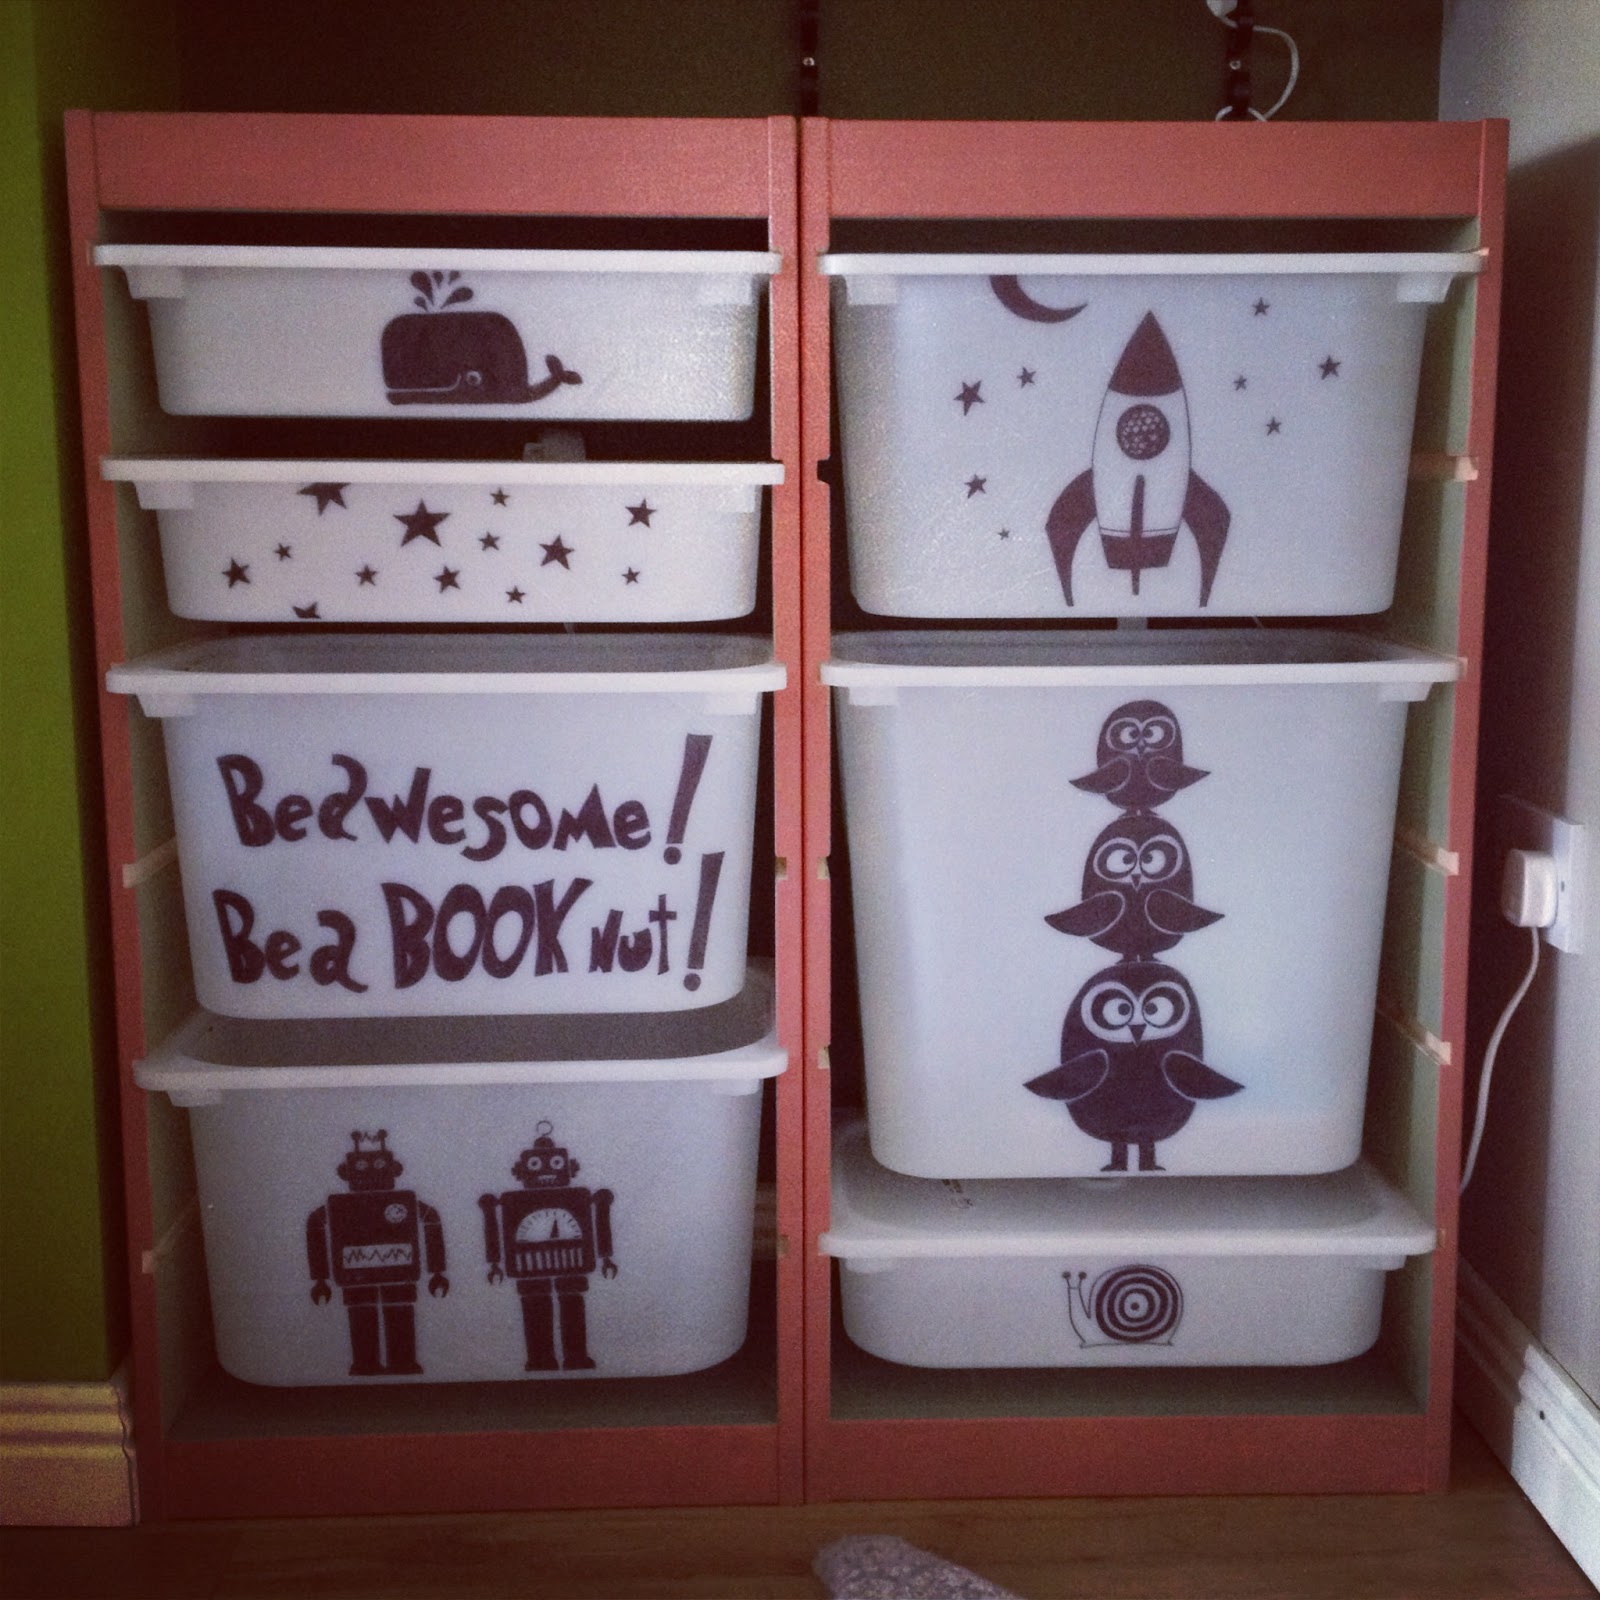
4) I selected funky designs and 'Dr Seuss' quotes from the Internet and copied them onto both sides of the boxes with a permanent Sharpie marker


A note on Dr Seuss. My friend (who is a South African children furniture designer coming out with her first collection soon, coolest person ever and one of my greatest inspirations) introduced me to Dr Seuss who I never heard of before and was not part of my Hungarian child hood. I love how he is super intelligent and his books have messages for kids and adults alike.

Note: the quote on the photo is a bit messed up, it doesn't read as well as I wish: "Be Awesome, Be a BOOK NUT."(It looks a bit more like "Bed Wesome, Bed Book Nut") I confess it was late when I did it while watching "The Office" with the husband and I rushed it. Ah well... I can live with it.

What do you think? You could do so much with the boxes. You can get actual stickers or use coloured markers. Also if you aren't that handy copying by eye the boxes are quite see through so you can just pop the right size of image on the inside and draw over it. Does your child have a favourite book? Get a box, stick a page of the book under, draw over and you'll be the coolest mom on the block :) Older kids could do it themselves, couldn't they?


Just a quick reminder to like the facebook page if you haven't already. I post loads of cool design inspirations on there on a regular basis... See you guys soon

Sunday, May 05, 2013

DIY Baby Magnets for €4? Yes please!

Guys, this is such an easy DIY, it's almost a cheat.  No skills needed at all. If you got €4 and 15 minutes to spare you are sorted!

I recently discovered that Rián loves magnets. He can spend a good length of time at the fridge playing with them giving me precious time to get stuff done. So I needed more baby friendly magnets and I needed them quick. Off I went to find some with the a great vision in my head of nice designer type magnets, soft wooden shapes or quirky animals and figures or so. No luck. 

As a last resort I called into my favorite craft shop to see what they have on offer but instead of buying a ready made pack of not even fantastic magnets for a small fortune I found this guy:


The magnetic tape! For €4! Now this is the kinda price I like paying for stuff. :)) You can't see the price on the photo but trust me it is €4. At this in a craft shop in the shopping center. I bet you that B&Q or Woodies would have some even cheaper.

Back at home I thought long and hard what can I stick on that is safe to play with and come with a selection of very random stuff:

corks
jar tops
a rubber duck
a soft baby book
wooden building blocks


and then I just couldn't stop......:)

an outgrown baby shoe
and other baby book
few empty plastic bottles
and old teething ring


they all ended up on the fridge. And little mister trouble maker just loves them!


The only problem is that I had to remove the rubber duck from the selection as the dog kept running away with it. Until the issue resolves it went out of reach. Sorry Cooper! :)


Oh yes, the most important. The sticky bit on the magnet isn't great for the heavier stuff so for added safety use a drop of superglue. And you know, judge yourself and do not stick anything on that could be a choking hazard if it comes off. And always supervise your baby while playing. But you know all that anyway. :)

Make sure to check out and like our Facebook page to not to miss those very important daily updates.

Thank you for reading! :) Dora


Tuesday, April 30, 2013

Upcycled Kitchen Chairs


Recently I came across photos of our house renovation we completed almost three years ago and I realised that at the time I took loads of photos with the intention of creating a blog in the future . Well now this is the future (how weird) so I’m gonna show you how I painted my kitchen chairs and made them look like this:


WARNING! This is a picture of my kitchen pre-baby and pre-stay at home motherhood. This is my super tidy, super organized, fresh flowered kitchen. I can hardly believe myself it ever looked like this (and it did) ‘cause as you all know most of the time it looks like this.

These chairs were big in the 80’s, everybody had them. And the thing is that I understand why, they are solid wood, very hard wearing and quite pretty if you can see behind the varnish.


This was my first spray painting experience. I was excited. Up until the moment I realised I have to sand the varnish off in order to give them a new coat of paint. And I tell you, as much as I love DIY I HATE sanding! Seriously I would rather paint a room top to bottom, including the ceiling and skirting boards than sand a small piece of wood down. Okay maybe if it’s a small piece I'd do it, but a chair? With all the details? No thank you. 

What was the solution then? A multi-surface primer. A girl’s best friend!

And guess what? It worked. :)

And it was actually so easy I surprised myself. I applied a multi-surface primer (one of those you have to apply onto a cloth and then onto the surface). Let it dry according to the manufacturers instruction and then sprayed.
Like this. Looks easy. And it is. 


Do it outdoors though as it’s a smelly smelly job. And wear a mask. Don’t skip that part cause it’s very bad for you! It took approx 10-15 min/chair.
Today, almost 3 years later I’m sitting on the very same chair as we speak. They are chipped in places but we still love them. A protective varnish layer would have been clever to apply on top, but I didn’t and hence the reason why they are chipped. I don’t mind though as it adds character, or so I like to believe.

I rescued these chairs from my father in-laws shed. They were the chairs from the old kitchen table. The very same chairs my husband used to sit on, do his homework on, eat his dinner on. And now our son will hopefully do all these same things on these very same chairs...how cool is that? I spoke about it here on a previous blog post but I'm going to repeat it again. I just love taking an old piece of furniture off the scrapheap and giving it a second chance at life with a bit of love and attention. The colours aren't to everyone's taste but they bring life and fun into our kitchen and are a real talking point with visitors. These chairs are now one of my favourite things in our whole house.

So what do you think? Will you try spray painting soon? The brand I use is called Montana. Available nationwide, I buy mine in O’Sullivans Graphics in Dublin. 5 cans for €20

ps: for more super important updates be sure to like our Facebook page

Thursday, April 25, 2013

The Hallway

I have one problem with my hallway. I DON'T HAVE ENOUGH OF IT! I thought I did well when I got made a small built in cabinet for coats, pull out drawers under the stairs and put small shoe cabinets on the wall for shoes, yet it's not enough. Not at all!

On the antenatal class nobody, repeat NOBODY told me that I will need a degree in logistics just to fit all the baby equipment in the door.

Where do you all keep your stuff? Please tell me. Is there a secret?

The giant buggy? And your second buggy? The baby carriers? And the car seat? And the nappy bag? The warm buggy blanket, the light buggy blanket, the inbetween buggy blanket? And the footmuffs and rain covers?

And is it just me who absolutely hates the baby gates with their finger braking locks and awkward positioning?


If you know better, please come and fix my hallway and I will reward you with a DIY nursery lamp like this. (no joke). :)


Wednesday, April 24, 2013

Mini Me Lunches - Sweet Potato Soup with Chilli and Lime


Sweet potato soup we love! And we eat a lot of it. It's quick to make, very tasty and nutritious. Recently on a 'what to make for Rian' struggle session I realised that my thick soup doubles as a perfect pasta sauce for him. Good idea or what? :) I just have to be more sparing with the chilli when making the soup.

Ingredients for the soup:

- 2-3 small or 1-2 big sweet potato, peeled and cut into chunks
- 1 teaspoon of fresh chilli paste
- the juice of 1-2 limes, depends how juicy they are
- 2 tablespoon of honey or demara sugar
- pinch of salt

Method:

1) Cook the sweet potato until soft. From boiling it cooks in a few minutes. You may want to remove some of the cooking water before blending to get a thick enough consistency.
2) Blend it into a thick soup using a blender. I find hand blender the handiest for this job.
3) Add the chilli, the lime juice and the honey, stir and keep it warm till serving.

For baby:
- Cook the pasta of your choice. (I use the Asian egg noodles from Lidl a lot)
- Pour the soup over and mix.
- Add small chopped good quality ham and spoonful of full fat natural yoghurt for a balanced meal.


Serve at the same time and enjoy.


Monday, April 22, 2013

27 unpainted eggs and flying alone with a 9 months old

It's been almost a month since I last blogged. Life has took over for a while but I'm slowly managing to get things back under control. I think anyway... If you read the last post you know I was on the way to the airport to pick up my friend and her family and we were gonna have a fun filled Easter with dinner parties every evening and plenty of sight seeing. Well yes..... that was the plan. However a vomiting bug going through the whole household for 3 full days wasn't in the plan. It was bad! For the rest of the week we had a great time and our friendship grew even stronger. However 27 unpainted eggs and big chunk of ham still in the freezer I can say Easter past by me without taking notice.

Also, another unpredictable turn of events, my Nana got very sick I had to fly to Hungary at a days notice. I ended up staying for 2 weeks, but now things are looking up and we are back home in Ireland and settling back to normality. May I mention here please that I flew twice with a 9 months old on my own and for that I think I deserve some sort of a medal. OMG!!! And I thought the last flight we had at 3 months was difficult.

Now enough of me nagging, that is not what you are here for.:)  I am full of ideas for the next while, so just bare with me. The only slight problem is that my Baba is now mobile and our days are hectic and more exhausting so I find myself more tired the ever before. (how is that even possible?) Also he pushed his bedtime from 6.30pm to 8.30pm which kinda screws up my freetime big time. I used to do my art and craft from 7-10pm. I have to adjust to this new routine which is still a work in progress.
On the upside  he only wakes once or twice now (waheyyy!!!) and does 1 big nap a day up to 2.5 blissful hours. 

For the next few weeks I'm planning to work on these projects:
- finish the play corner, see firsts step here
- make more sensory DIY toys inspired by the amazing Imagination Tree blog
- attack the garden and create an outdoor play area (where do you get used car tires for free I wonder)
- start making a quilt from Baba's outgrown clothes for his 1st birthday
- start making homemade decoration for the 1st birthday party

Personal goals to achieve:
- must keep up with my yoga  practice at least once a week, ideally twice! I am stressed out, unbalanced, stiff and still have a good bit of baby weight to shift off. Time has to be dedicated to yoga. Period.
- walk in the mornings again with the buggy and the dog and not to come up with excuses why I can't
- try new recipes and post them. Asian and Raw food in particular
- spring clean the house (hahahahahahaha, this is a joke obviously, unless I hire a cleaner which I can't afford or I get somebody to watch my son for like a week so I can start and finish jobs)
- drink more green smoothies and less coffee in the morning (for recipe see here)
- win the lotto and hire a nanny

Thanks for stopping by!

Picture below showing the result of my last projects. See tutorial here.


Wednesday, March 27, 2013

Foam stamped matching T-shirts


Okay, my first and last post this week. I’m super excited, we have visitors from Germany on the way. Literally on the way. Hope the bloody snow won’t delay or even stop them. Seriously what is going on? This time last year we were having breakfast outside in 22 degrees… and now I’m sending the husband for more firewood and bought a sheepskin liner for the buggy… 

Anyway, point is that I have loads to get done before heading to the airport to make sure they are not walking into this scenery. (the mess

We have a busy week ahead I’m sure. 2 babies and 4 adults and a crazy dog under the 1 roof, but hey the more the merrier no? Funny to think that the last time I saw my friend we were both single and spent a week partying and now we are both mammies and our babies are 2 months apart in age.

My friend has a baby girl and I wanted to make some souvenir for her that she can keep. I also wanted Rián to have a keep sake. So I thought I will make a matching T-shirts for them with a simple design including the date on somehow. The husband said it’s cheesy, I think it’s damn cute and I will make sure to take a photo with the two little spuds wearing them and post it. 

So I got 2 similar white t-shirt in H&M. They were €3 each. I bought fabric paint (€5-10 in craft shops depending on the brand) and a sheet of foam (95 cents). I did some research on this technique and it seemed fairly easy, however I had no idea what the outcome would be like. It turned out well, better than I expected, the lines are nice and clear. The paint didn’t go evenly with all the stars, but I kinda like that weathered look anyway. I used a wall paint brush to paint the neck and sleeve lines but I could have done a much better job with a small artist paint brush.

Pictures below. Do you like it? I can see myself already doing a few more T-shirts for a special occasions like 1st Birthday with the number 1 all over it. For the writing I used a Sharpie fabric marker.


Have you tried foam stamping yet?